해당 내용은 Udemy의 Certified Kubernetes Administrator (CKA) with Practice Tests 강의를 공부한 내용입니다. 내용을 그대로 번역하기보다는, 제가 이해하기 쉬운 대로 수정한 부분들이 있습니다.
⚠️ 영어 독해가 많이 부족합니다. 틀린 내용이 있으면 알려주시면 감사하겠습니다.
Q1. How many pods exist on the system? In the current(default) namespace.

답: 0
Q2. Create a new pod with the nginx image.
- Image name: nginx

Q3. How many pods are created now? Note: We have created a few more pods. So please check again.

답: 4
Q4. What is the image used to create the new pods? You must look at one of the new pods in detail to figure this out.

답: BUSYBOX
Q5. Which nodes are these pods placed on? You must look at all the pods in detail to figure this out.
각 Pod에 대하여 kubectl describe pod 파드이름 커맨드를 입력하여 노드를 확인해도 됩니다.

또는, kubectl get pods -o wide커맨드로 노드를 확인할 수 있습니다.

답: controlplane
Q6. How many containers are part of the pod webapp? Note: We just created a new POD. Ignore the state of the POD for now.
kubectl get pods커맨드를 입력했을 때 나오는 결과에서 webapp 옆의 '1/2'가 보입니다. container 2개 중 1개가 READY가 되었다는 것이므로 컨테이너 수는 2개입니다.

또 다른 방법으로는 kubectl describe pod webapp커맨드를 통해 확인하는 방법이 있습니다.

답: 2
Q7. What images are used in the new webapp pod? You must look at all the pods in detail to figure this out.
kubectl describe pod webapp커맨드를 통해 확인할 수 있습니다.

답: nginx & agentx
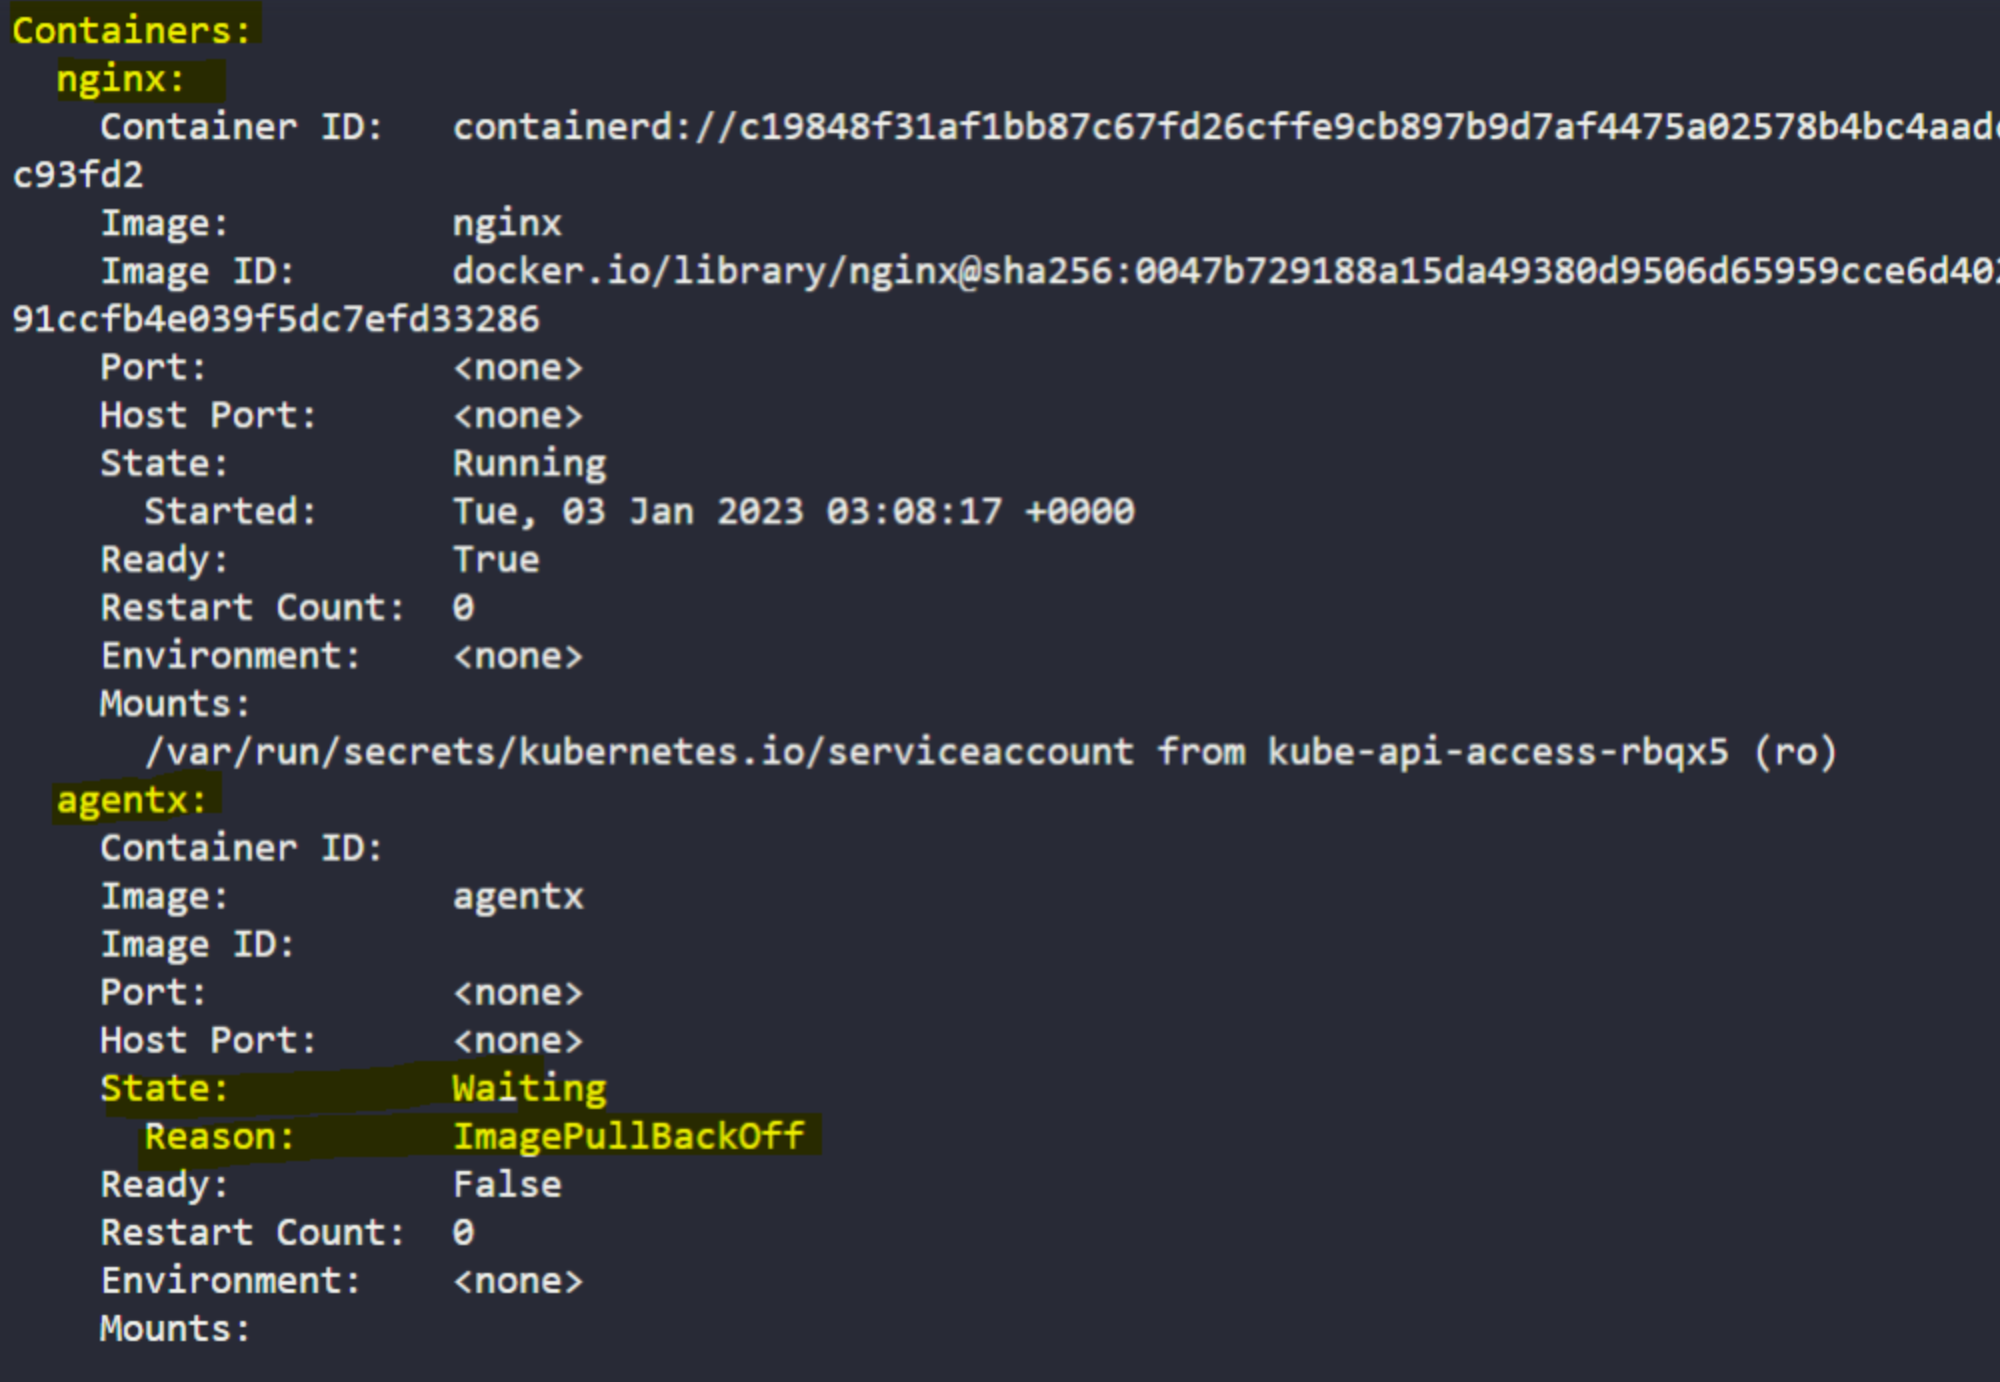
Q8. What is the state of the container agentx in the pod webapp? Wait for it to finish the ContainerCreating state
kubectl describe pod webapp커맨드를 통해 확인할 수 있습니다.
![[Pasted image 20230103122017.png]]
답: Error or Waiting
Q9. Why do you think the container agentx in pod webapp is in error? Try to figure it out from the events section of the pod.
kubectl describe pod webapp커맨드를 입력하면 컨테이너의 State와 Reason을 확인할 수 있습니다.

지금은 ImagePullBackOff라고 써있네요. 조금 더 스크롤을 내려보면 Events섹션이 보이고, 자세한 원인을 파악할 수 있습니다.

답: A Docker image with this name doesn't exist on Docker Hub
Q10. What does the READY column in the output of the kubectl get pods command indicate?

답: Running Containers in POD / Total Containers in POD
Q11. Delete the webapp Pod. Once deleted, wait for the pod to fully terminate.
kubectl delete pod webapp 커맨드로 파드를 삭제할 수 있습니다.

Q12. Create a new pod with the name redis and with the image redis123. Use a pod-definition YAML file. And yes the image name is wrong!
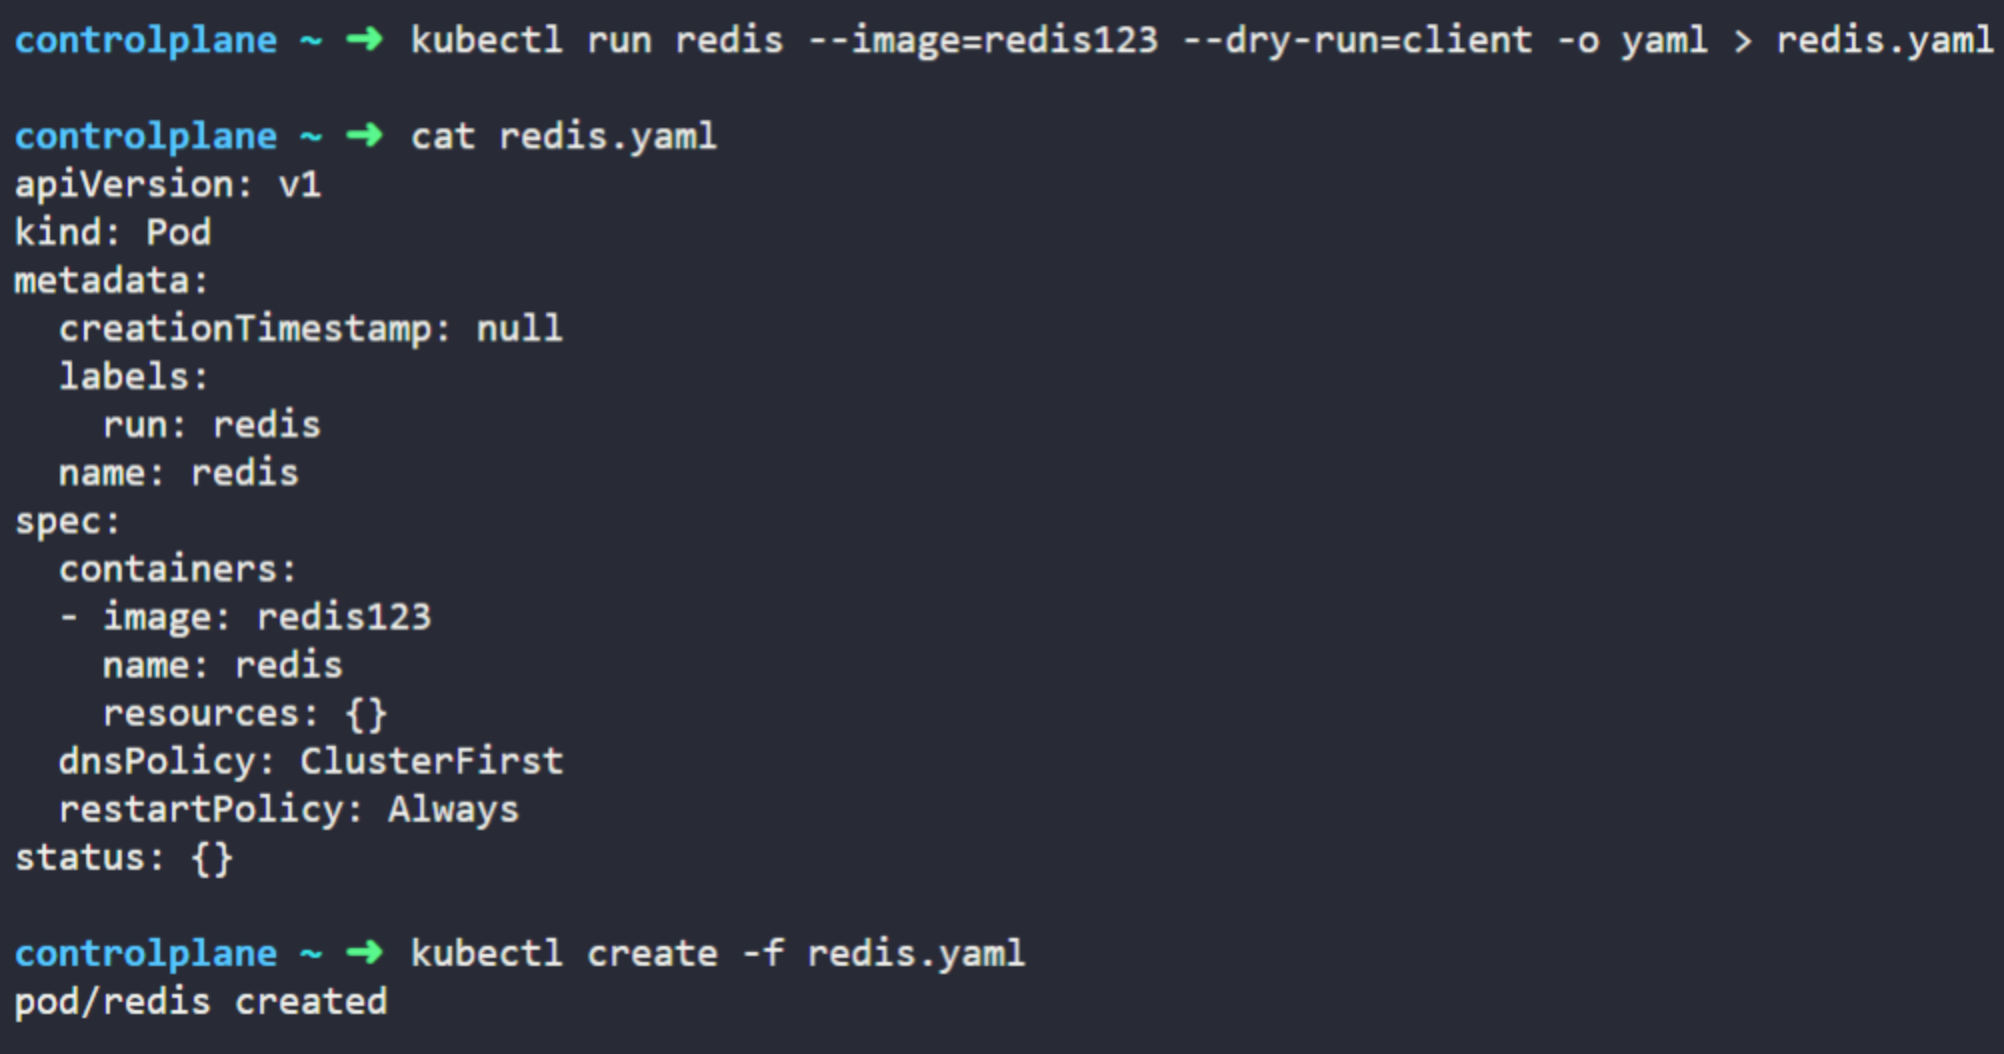
kubectl run redis --image=redis123 커맨드를 입력하면 바로 파드가 생성되지만, 문제에서는 YAML파일로 파드를 생성하기를 요구하고 있습니다. 따라서 YAML파일을 생성해줍니다.
kubectl run redis --image=redis123 --dry-run=client -o yaml 과 같이 --dry-run=client -o yaml옵션을 붙이면 실제로 실행하지는 않고(쿠버네티스 API서버에 전송하지는 않고), yaml형식으로 stdout에 출력합니다.

기존에는 --dry-run -o yaml옵션을 사용했던 것 같은데, --dry-run=client -o yaml로 대체되었다고 하네요.

yaml내용을 잘 확인 한 후 내용을 그대로 redis.yaml파일로 옮깁니다.
kubectl run redis --image=redis123 --dry-run=client -o yaml > redis.yaml커맨드를 입력하여 redis.yaml파일을 생성하고, kubectl create -f redis.yaml커맨드로 (혹은 kubectl apply -f redis.yaml커맨드로) 파드를 생성합니다.

Q13. Now change the image on this pod to redis. Once done, the pod should be in a running state.
Q12에서 만든 파드의 이미지를 수정합니다. 현재 redis파드의 상태가 ErrImagePull입니다.

아래 커맨드로 yaml파일을 열어주고 image를 수정(i로 입력모드)합니다.
vi redis.yaml

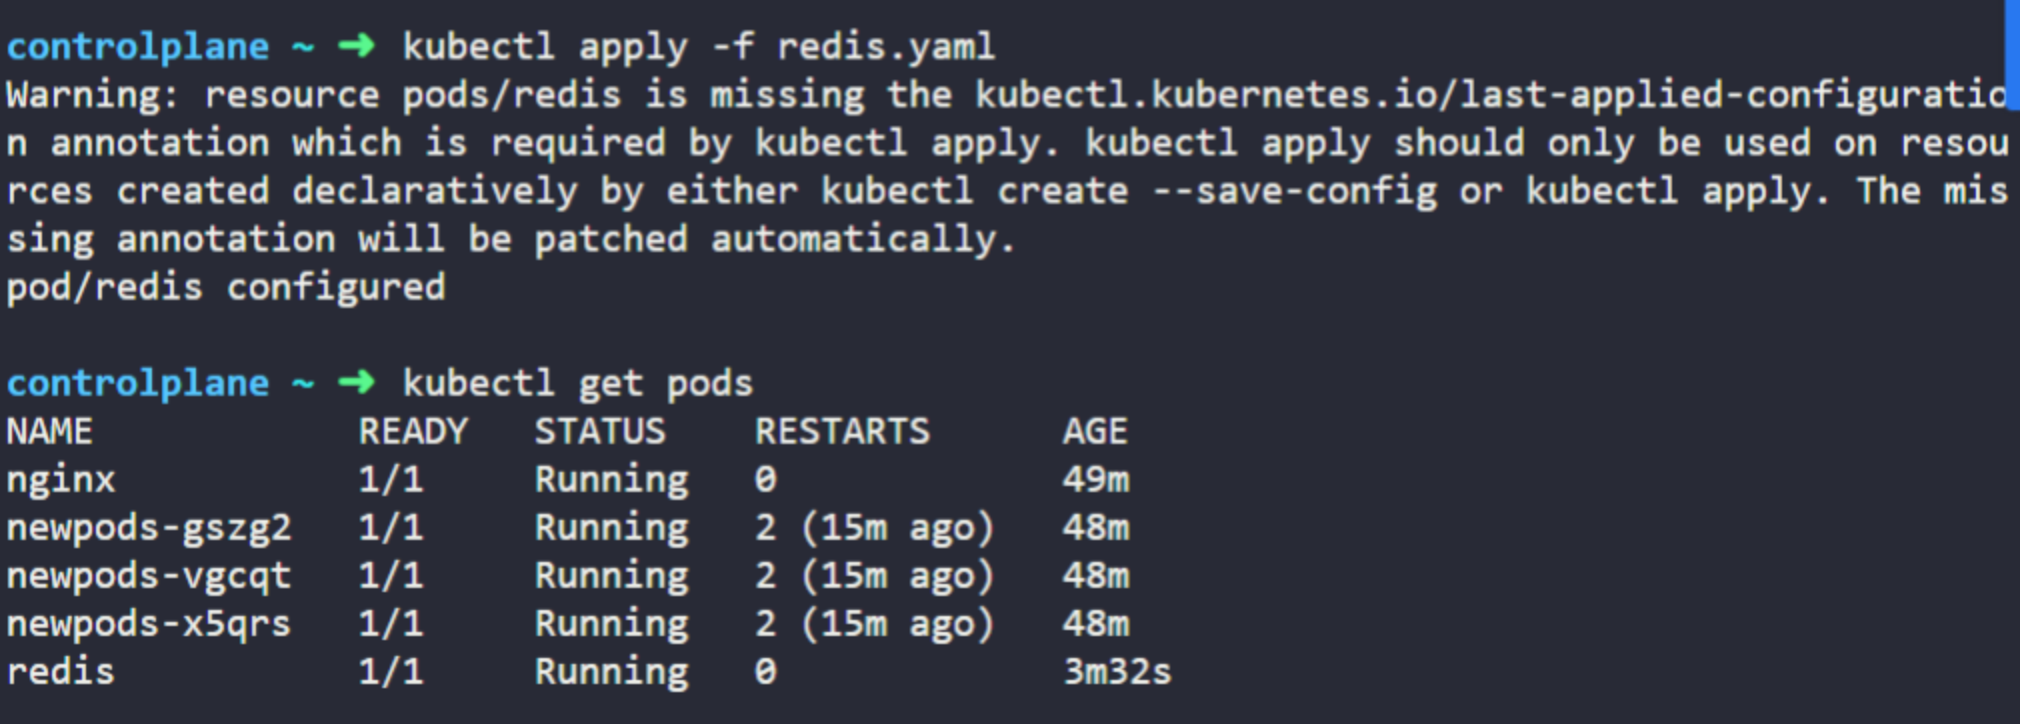
Esc :wq!로 저장 후 kubectl apply -f redis.yaml커맨드로 수정 내용을 적용합니다. kubectl get pods로 상태를 확인하면 Running이 된 것을 확인할 수 있습니다.

'MLOps > Doker & Kubernetes' 카테고리의 다른 글
| Udemy CKA 강의 정리 29: Practice Test - ReplicaSets (0) | 2023.01.04 |
|---|---|
| Udemy CKA 강의 정리 28: Recap - ReplicaSets (0) | 2023.01.04 |
| Udemy CKA 강의 정리 26: Practice Test - Pods (0) | 2023.01.03 |
| Udemy CKA 강의 정리 25: Accessing the Labs (0) | 2023.01.03 |
| Udemy CKA 강의 정리 24: Demo: Accessing the Labs (0) | 2023.01.03 |
댓글